Blog

  • weatheralerts

    An integration to get weather alerts from weather.gov

    GitHub release (latest by date) GitHub hacs_badge

    GitHub stars GitHub GitHub issues GitHub commits since latest release (by SemVer)

    Breaking changes

    v0.1.2

    • The YAML packages currently available for weatheralerts v0.1.2 are not compatible with prior versions of weatheralerts. Older YAML packages should still work with weatheralerts v0.1.2, however, the most recent YAML package files contain new features and fixes.

    Installation Quickstart

    This qickstart install guide assumes you are already familiar with custom component installation and with the Home Assistant YAML configuration. If you need more detailed step-by-step instructions, check the links at the bottom for detailed instructions. Troubleshooting information, weatheralerts YAML package information, and Lovelace UI examples are also included in the Links at the bottom.

    Install the weatheralerts integration via HACS. After installing via HACS, don’t restart Home Assistant yet. We will do that after completing the YAML platform configuration.

    You will need to find your zone and county codes by looking for your state or marine zone at https://alerts.weather.gov/. Once at https://alerts.weather.gov/, click the Land area with zones link and you will find a list of states with Public Zones and County Zones links. Once you find your state , click into the Public Zones and County Zones links and find the respective codes for your county. All you will need are just the first two letters (your state abbreviation) and the last three digits (zone/county ID number) of your zone code and county code to put into the platform configuration. The zone and county ID numbers are not usually the same number, so be sure to look up both codes. For marine zones, go to https://alerts.weather.gov/, click the Marine regions/areas with zones link and you will find a list of marine areas with Zones links. In the Zones link for the marine area you are interested in, find the exact marine zone. The first two letters of the marine zone is what will be used for the state configuration option, and the last three digits is what will be used for the zone configuration option (omit any leading zeros).

    Once installed and you have your state (or marine zone) abbreviation and ID numbers, add the weatheralerts sensor platform to your configuration. If your state is Wisconsin and your county is Outagamie, then the state abbreviation is WI, the zone ID number is 038, and the county ID number is 087. For the ID numbers, remove any leading zeros and your YAML platform configuration would look something like this:

    sensor:
      platform: weatheralerts
      state: WI
      zone: 38
      county: 87

    Once your configuration is saved, restart Home Assistant.

    That completes the integration (custom component) installation.

    Check the Links below for more detailed instructions, troubleshooting, and for YAML package and Lovelace UI usage and examples.

    Updating via HACS

    Check the Breaking Changes section of this README to see if you need to manually update the YAML packages or make any changes to your custom YAML or Lovelace UI cards. Simply use the Update button for the weatheralerts integration within HACS if there are no breaking changes and then restart Home Assistant.

    Links

    Reconfiguration via UI

    You can reconfigure the integration through the Home Assistant UI:

    1. Go to Settings > Devices & Services.
    2. Find the Weather Alerts integration and click on it.
    3. Click Configure.
    4. Update the State, Zone, and County values.
    5. Click Save. The integration will automatically reload.

    Todo list

    • Add more documentation
    • Add config flow to allow UI-based configuration (eliminate yaml-based platform configuration)
    • Create alternative (possibly simpler) YAML package or move some template sensors into the integration
    • Add backup weather alert source for occasions when weather.gov json feed is experiencing an outage
    • Add Canadian weather alerts
    Visit original content creator repository
  • clear-regex

    clear-regex

    Write regular expressions clearly with comments and named matches.

    Usage

    The most convenient way to use clear-regex is with tagged template literals. This way it’s easy to

    • split regular expression accross lines
    • add comments
    • use other regexes or values inside the new regex

    const crx = require('clear-regex');
    
    const yearRx = /\d{4}/;
    const monthRx = /\d{2}/;
    const dayRx = /\d{2}/;
    
    const myNewRegex = crx`
            # this matches date strings like '2019-01-13'
            ${yearRx}-      # this is the year part
            ${monthRx}-     # month part
            ${dayRx}        # day part
        `;

    The comments, whitespace and newline characters get stripped away and the result of the above is the same as

    const myNewRegex = /\d{4}-\d{2}-\d{2}/;

    Comments

    The comments begin with a # character and go until the end of the line. Use them to explain what a certain part of your regular expression does.

    const phoneNumber = crx`
        # matches phone numbers
        #
        # there can be any number of digits
        # optionally grouped with spaces or dashes
        #
        ^\s*            # optional whitespace at the beginning
        (\+|0+)         # start with a plus or zeros
        (               # begin group od digits
            ([- ])?     # optional delimiter
            (\d+)       # some digits
        )+              # end group of digits
        \s*$            # optional whitespace at the end
    `;

    Placeholders

    If you use clear-regex as a tagged template literal, you can use placeholders to insert literal values or other regular expressions into your new regex. This makes dynamic regexes and reuse convenient.

    const year = 2019;
    const monthRx = /\d{2}/;
    const dayRx = /\d{2}/;
    
    // match a date date string in 2019
    const dateRx = crx`^${year}-${monthRx}-${dayRx}`;

    Named matching groups

    You can use give names to your matching groups. This will make it easier to retrieve them from a matching result. The name tags look like ?<name>.

    const regex = crx`^
        (?<year>\\d{4})-
        (?<month>\\d{2})-
        (?<day>\\d{2})
    $`;
    
    '2019-01-13'.match(regex);
    
    // the result contains the groups prop with
    // the named matches
    //
    // {
    //     ...
    //     groups: {
    //         day: '13',
    //         month: '01',
    //         year: '2019'
    //     }
    // };

    Using flags

    To use flags with the tagged template literals, start and end your reges with slashes, as you normally would, and put the flags after the closing slash.

    const regex = crx`/
        ice
        (cream|coffee)
        /gi`;
    
    // this is the same as
    const sameRegex = /ice(cream|coffee)/gi;

    Visit original content creator repository

  • mobile-carrier-bot

    mobile-carrier-bot

    Build Status

    A bot to access mobile carrier services, currently supports

    • Three IE
    • TIM
    • Iliad

    🚧🚧🚧🚧🚧🚧🚧🚧🚧🚧
    ⚠️ Heavy Work in Progress ⚠️
    🚧🚧🚧🚧🚧🚧🚧🚧🚧🚧

    TODO (not in order):

    • skeleton, plugins, setup
    • architecture docs and diagrams
    • healtcheck status/info/env
    • expose prometheus metrics via endpoint
    • expose JVM metrics via JMX
    • scalatest and scalacheck
    • codecov or alternatives
    • telegram client (polling)
    • slack client (webhook)
    • scrape at least 2 mobile carrier services to check balance
    • (polling) notify for low credits and expiry date
    • in-memory db with Ref
    • doobie db with PostgreSQL and H2
    • if/how store credentials in a safe way
    • authenticated endpoints as alternative to telegram/slack
    • write pure FP lib alternative to scala-scraper and jsoup (I will never do this!)
    • fix scalastyle and scalafmt
    • slate static site for api
    • gitpitch for 5@4 presentation
    • constrain all types with refined where possible
    • travis
    • travis automate publish to dockerhub
    • publish to dockerhub
    • create deployment k8s chart
    • create argocd app
    • statefulset with PostgreSQL
    • alerting with prometheus to slack
    • grafana dashboard
    • backup/restore logs and metrics even if re-create cluster
    • generate and publish scaladoc
    • fix manual Circe codecs with withSnakeCaseMemberNames config
    • add gatling stress tests
    • add integration tests
    • manage secrets in k8s

    Endpoints

    # healt checks
    http :8080/status
    http :8080/info
    http :8080/env
    

    Development

    # test
    sbt test -jvm-debug 5005
    sbt "test:testOnly *HealthCheckEndpointsSpec"
    sbt "test:testOnly *HealthCheckEndpointsSpec -- -z statusEndpoint"
    
    # run with default
    TELEGRAM_API_TOKEN=123:xyz sbt app/run

    sbt aliases

    • checkFormat checks format
    • format formats sources
    • update checks outdated dependencies
    • build checks format and runs tests

    Other sbt plugins

    • dependencyTree shows project dependencies

    Deployment

    # build image
    sbt clean docker:publishLocal
    
    # run temporary container
    docker run \
      --rm \
      --name mobile-carrier-bot \
      niqdev/mobile-carrier-bot-app:0.1
    
    # access container
    docker exec -it mobile-carrier-bot bash
    
    # publish
    docker login
    docker tag niqdev/mobile-carrier-bot-app:0.1 niqdev/mobile-carrier-bot-app:latest
    docker push niqdev/mobile-carrier-bot-app:latest

    Charts

    # print chart
    helm template -f charts/app/values.yaml charts/app/
    
    # apply chart
    helm template -f charts/app/values.yaml charts/app/ | kubectl apply -f -
    
    # verify healtcheck
    kubectl port-forward deployment/<DEPLOYMENT_NAME> 8888:8080
    http :8888/status
    
    # logs
    kubectl logs <POD_NAME> -f

    Visit original content creator repository

  • baskets

    Baskets

    coverage_badge

    A website to manage orders for local food baskets.

    Project built using Django, Bootstrap and JavaScript.

    Baskets screenshot

    Table of contents

    1. Background and goal
    2. Features
    3. Dependencies
    4. Run using Docker
    5. Populate dummy database
    6. Configure SMTP
    7. Tests run
    8. API Reference
    9. UI Language

    Background and goal

    This project has been developed to meet a real need for a local association.

    The aforementioned association centralizes orders for several local food producers. Thus, food baskets are delivered regularly to users.

    Before the deployment of this application, administrators got orders from users via SMS or email.

    Baskets app aims to save them time by gathering user orders in one unique tool.

    Payments are managed outside this application.

    Features

    User interface

    • Sign In page:
      • User account creation entering personal information and setting a password.
      • Passwords are validated to prevent weak passwords.
      • A verification email is sent to user with a link to a page allowing them to confirm their email address.
    • Sign Up page:
      • Users with verified email can log in using their email and password.
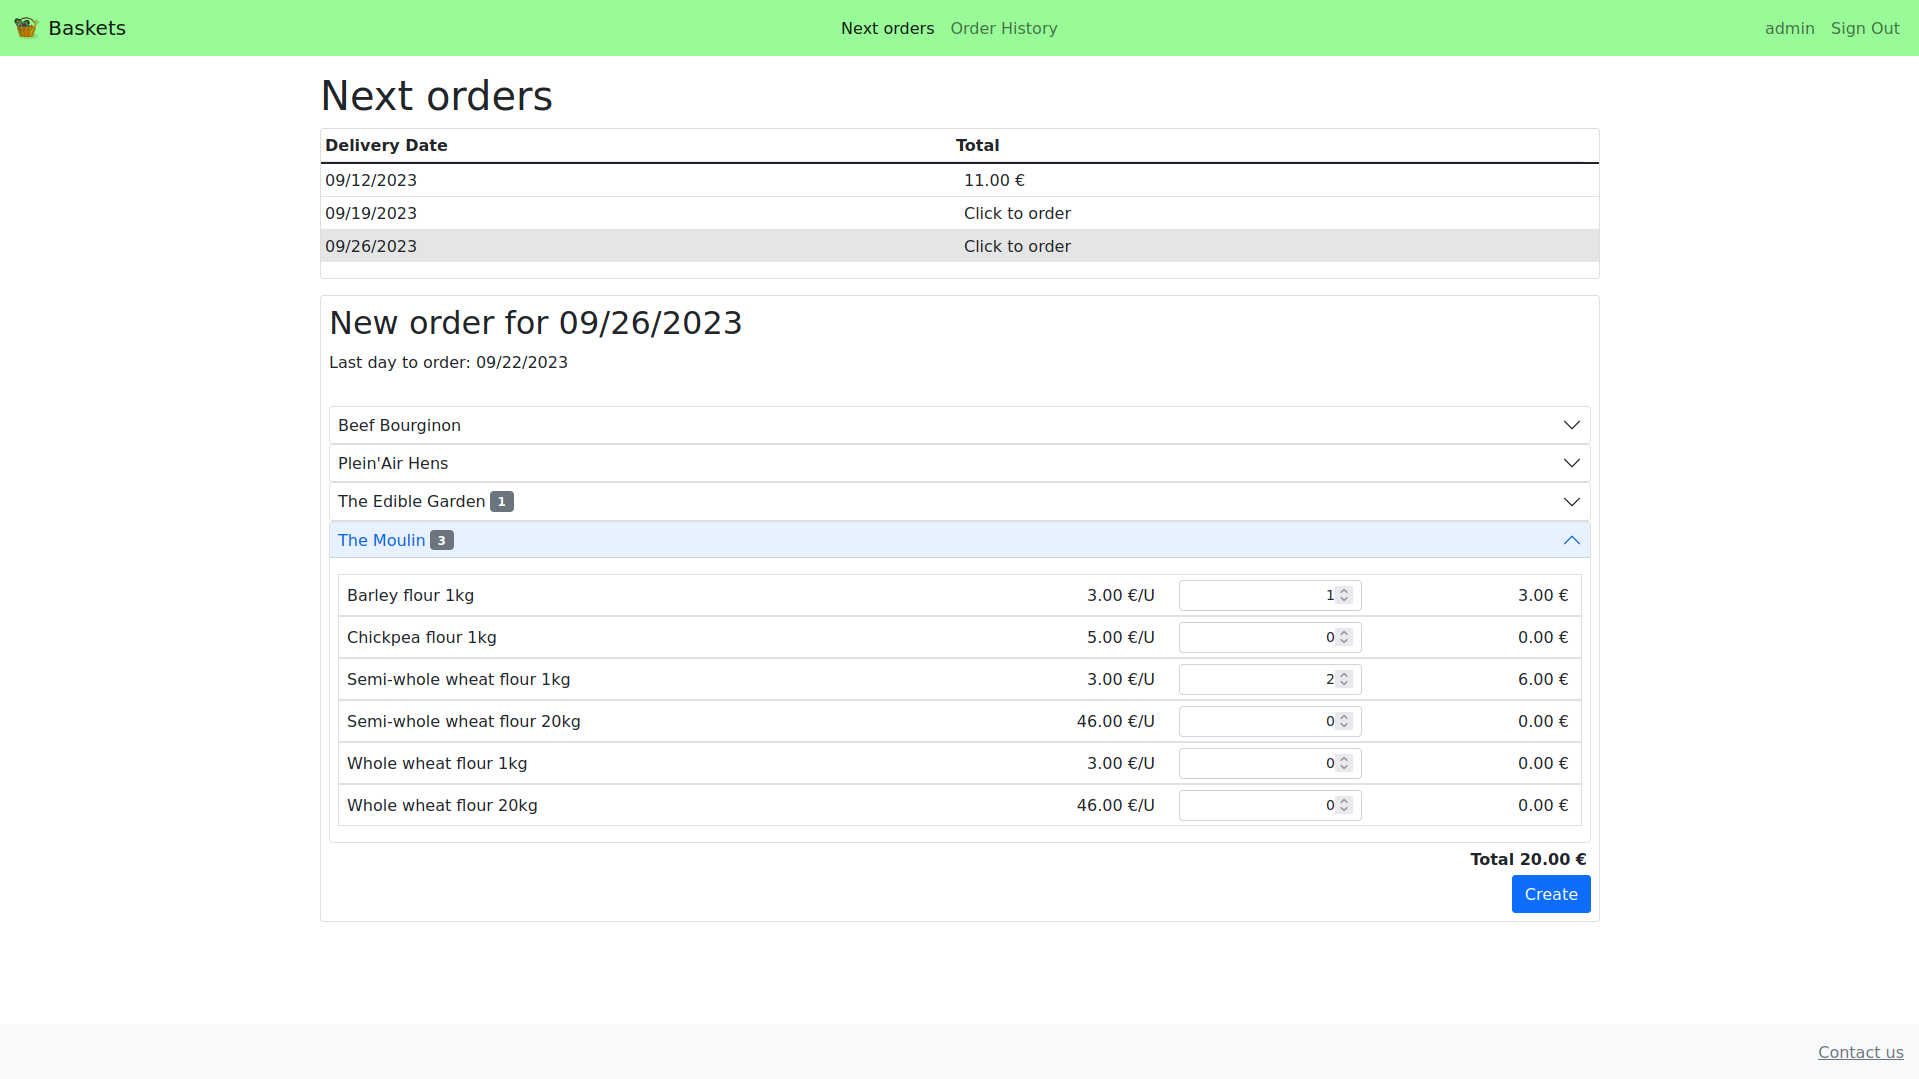
    • Next Orders page:
      • Shows the list of deliveries for which we can still order, in chronological order.
      • Clicking on each delivery opens a frame below showing delivery details: delivery date, last day to order and available products arranged by producer.
      • User can create one order per delivery.
      • Orders can be updated or deleted until their deadline.
    • Order history page:
      • Shows a list of user’s closed orders in reverse chronological order.
      • Clicking on each order will open its details below.
    • Password reset:
      • In “Login” page, a link allows users to request password reset entering their email address.
      • If an account exists for that email address, an email is sent with a link to a page allowing to set a new password.
    • Profile page:
      • Clicking on username loads a page where users can view and update its profile information.
    • Contact us page:
      • A link on footer loads a page with a contact form. The message will be sent to all staff members.

    All functionalities except “contact” requires authentication.

    Admin interface

    Users with both “staff” and “superuser” status can access admin interface.

    • Users page:
      • Manage each user account: activate/deactivate, set user groups and set staff status.
    • Groups page:
      • Manage groups.
      • Email all group users via a link.
    • Producers page:
      • Manage producers and its products (name and unit price).
      • Deactivate whole producer or single product:
        • Deactivated products won’t be available for deliveries.
        • If a product with related opened order items is deactivated, those items will be removed and a message will be shown to email affected users.
      • Export .xlsx file containing recap of monthly quantities ordered for each product (one sheet per producer).
      • If a product has related opened order items and its unit price changes, related opened orders will be updated and a message will be shown to email affected users.
    • Deliveries page:
      • Create/update deliveries, setting its date, order deadline, available products and optional message.
        • If “order deadline” is left blank, it will be set to ORDER_DEADLINE_DAYS_BEFORE before delivery date.
      • View total ordered quantity for each product to notify producers. A link allows seeing all related Order Items.
      • If a product is removed from an opened delivery, related opened orders will be updated and a message will be shown to email affected users.
      • In “Deliveries list” page:
        • View “number of orders” for each delivery, which links to related orders.
        • Export order forms:
          • Once a delivery deadline is passed, a link will be shown to download delivery order forms in xlsx format.
          • The file will contain one sheet per order including user information and order details.
        • Action to email users having ordered for selected deliveries.
    • Orders page:
      • View user orders and, if necessary, create and update them.
      • In “Orders list” page:
        • Export .xlsx file containing recap of monthly order amounts per user.
        • If one or several orders are deleted, a message will be shown to email affected users.

    Other

    • Mobile-responsiveness: This has been achieved using Bootstrap framework for user interface. Moreover, Django admin interface is also mobile responsive.
    • API: User orders can be managed using an API. See API reference for further details.
    • UI Translation: Translation strings have been used for all UI text to facilitate translation. See UI Language for further details.

    Dependencies

    In addition to Django, the following libraries have been used:

    Required versions can be seen in requirements (pip) or Pipfile (pipenv).

    Run using Docker

    $ git clone https://github.com/daniel-ob/baskets.git
    $ cd baskets
    

    Then run:

    $ docker compose up -d
    

    And finally, create a superuser (for admin interface):

    $ docker compose exec web python manage.py createsuperuser
    

    Please note that, for simplicity, console email backend is used by default for email sending, so emails will be written to stdout.

    Populate dummy database

    docker exec baskets-web sh -c "python manage.py shell < populate_dummy_db.py"
    

    Configure SMTP

    • Change backend on config/settings.py:
    EMAIL_BACKEND = "django.core.mail.backends.smtp.EmailBackend"
    
    • Set SMTP server config on .envs/.local/.web:
    # SMTP server config (if used)
    EMAIL_HOST=
    EMAIL_HOST_PASSWORD=
    EMAIL_HOST_USER=
    EMAIL_PORT=
    EMAIL_USE_TLS=
    

    Tests run

    Be sure you have ChromeDriver installed to run Selenium tests.

    First launch db container:

    $ docker compose up -d db
    

    Then open virtual environment and install all dependencies:

    $ pipenv shell
    (baskets)$ pipenv install --dev
    

    Finally, run all tests:

    (baskets)$ python manage.py test
    

    To run only functional tests:

    (baskets)$ python manage.py test baskets.tests.test_functional
    

    API Reference

    A Postman collection to test the API can be found here.

    Browsable API

    If settings.DEBUG is set to True, browsable API provided by REST framework can be visited on http://127.0.0.1:8000/api/v1/

    API Authentication

    All API endpoints requires token authentication.

    JWT token pair can be requested on /api/token/ providing username and password (request Body form-data). This returns access and refresh tokens.

    To authenticate requests, access token must be added to headers:

    Authorization: Bearer {{access_token}}
    

    When expired, access token can be refreshed on /api/token/refresh/ providing refresh token.

    List open deliveries

    List deliveries for which we can still order.

    GET /api/v1/deliveries/
    

    Response

     Status: 200 OK
    
    [
        {
            "url": "http://127.0.0.1:8000/api/v1/deliveries/3/",
            "date": "2023-06-27",
            "order_deadline": "2023-06-23"
        },
        {
            "url": "http://127.0.0.1:8000/api/v1/deliveries/2/",
            "date": "2023-07-04",
            "order_deadline": "2023-06-30"
        }
    

    Get delivery detail

    GET /api/v1/deliveries/{delivery_id}/
    

    Response

     Status: 200 OK
    
    {
        "id": 2,
        "date": "2023-05-30",
        "order_deadline": "2023-05-25",
        "products_by_producer": [
            {
                "name": "producer1",
                "products": [
                    {
                        "id": 1,
                        "name": "Eggs (6 units)",
                        "unit_price": "2.00"
                    },
                ]
            },
            {
                "name": "producer2",
                "products": [
                    {
                        "id": 2,
                        "name": "Big vegetables basket",
                        "unit_price": "1.15"
                    }
                ]
            }
        ],
        "message": "This week meat producer is on vacation",
    }
    

    List user orders

    GET /api/v1/orders/
    

    Response

     Status: 200 OK
    
    [
        {
            "url": "http://127.0.0.1:8000/api/v1/orders/30/",
            "delivery": {
                "url": "http://127.0.0.1:8000/api/v1/deliveries/2/",
                "date": "2023-07-04",
                "order_deadline": "2023-06-30"
            },
            "amount": "220.00",
            "is_open": true
        }
    ]
    

    Get order detail

    GET /api/v1/orders/{order_id}/
    

    Response

     Status: 200 OK
    
    {
        "url": "http://127.0.0.1:8000/api/v1/orders/30/",
        "delivery": 2,
        "items": [
            {
                "product": 5,
                "product_name": "Package of meat (5kg)",
                "product_unit_price": "110.00",
                "quantity": 2,
                "amount": "220.00"
            }
        ],
        "amount": "220.00",
        "message": "",
        "is_open": true
    }
    

    Create an order

    POST /api/v1/orders/
    
    {   
        "delivery": 3,
        "items": [
            {
                "product": 14,
                "quantity": 2
            }
        ],
        "message": "is it possible to come and pick it up the next day?"
    
    }
    

    Request must follow this rules:

    • delivery order_deadline must not be passed
    • a user can only post an order per delivery
    • all item products must be available in delivery.products

    Response

    Status: 201 Created
    
    (Created order detail)
    

    Update an order

    Orders can be updated until delivery.order_deadline.

    PUT /api/v1/orders/{order_id}/
    
    {   
        "delivery": 3,
        "items": [
            {
                "product": 14,
                "quantity": 1
            }
        ]
    }
    

    Response

     Status: 200 OK
    
    (Updated order detail)
    

    Delete an order

    DELETE /api/v1/orders/{order_id}/
    

    Response

     Status: 204 No Content
    

    UI Language

    Translation strings has been used for all text of user and admin interfaces, so all of them can be extracted into messages files (.po) to facilitate translation.

    In addition to default language (English), French translation is available and can be set on settings.py:

    LANGUAGE_CODE = "fr"
    

    The server must be restarted to apply changes.

    Adding new translations

    From base directory, run:

    django-admin makemessages -l LANG
    django-admin makemessages -d djangojs -l LANG
    

    Where LANG can be, for example: es, es_AR, de …

    This will generate django.po and djangojs.mo translation files inside locale/LANG/LC_MESSAGES folder.

    Once all msgstr in .po files are translated, run:

    django-admin compilemessages
    

    This will generate corresponding .mo files.

    Visit original content creator repository
  • sense-embedding

    Code style: black

    Sense Embedding

    Datasets

    The datasets used can be found here:

    Preprocessing

    Before train the model, We need to preprocess the raw dataset. We take EuroSense as example. EuroSense consist of a a single large XML file (21GB uncompressed for the high precision version), even though it is a multilingual corpus, we will use only the English sentences. The file can be filtered with the filter_eurosense() function inside preprocessing/eurosense.py file.

    The EuroSense files contains sentences, with already tokenized text. Each annotation marks the sense for a word in text identified by the anchor attribute. Each annotation provides the lemma of the word it is tagging and the synset id.

    <sentence id="0">
      <text lang="en">It is vital to minimise the grey areas and  [...] </text>
      <annotations>
        <annotation lang="en" type="NASARI" anchor="areas" lemma="area"
            coherenceScore="0.2247" nasariScore="0.9829">bn:00005513n</annotation>
        ...
      </annotations>
    </sentence>
    

    It is convenient to preprocess the XML in a single text file, replacing all the anchors with the corresponding lemma_synset. A line in the parsed dataset, from the example above, is

    It is vital to minimise the grey area_bn:00005513n and [...]
    

    We can run the parse.py script to obtain this parsed dataset.

    python code/parse.py es -i es_raw.xml -o parsed_es.txt 

    Train

    Gensim implementation of Word2Vec and FastText are used to train the sense vectors. The train script is implemented in the train.py file. To start the training phase, run

    python code/train.py parsed_es.txt -o sensembed.vec

    For a complete list of options run python code/train.py -h

    usage: train.py [-h] -o OUTPUT [-m MODEL] [--model_path SAVE_MODEL]
                    [--min-count MIN_COUNT] [--iter ITER] [--size SIZE]
                    input [input ...]
    
    positional arguments:
      input                 paths to the corpora
    
    optional arguments:
      -h, --help            show this help message and exit
      -o OUTPUT             path where to save the embeddings file
      -m MODEL              model implementation, w2v=Word2Vec, ft=FastText
      --model_path SAVE_MODEL
                            path where to save the model file
      --min-count MIN_COUNT
                            ignores all words with total frequency lower than this
      --iter ITER           number of iterations over the corpus
      --size SIZE           dimensionality of the feature vectors

    The output should be in the Word2Vec format, where the vocab is composed of lemma_synset1 and the corresponding vector.

    number_of_senses embedding_dimension
    lemma1_synset1 dim1 dim2 dim3 ... dimn
    lemma2_synset2 dim1 dim2 dim3 ... dimn
    

    Evaluation

    The evaluation consists of measuring the similarity or relatedness of pairs of words. Word similarity datasets (WordSimilarity-353) consists of a list of pairs of words. For each pair we have a score of similarity established by human annotators

    Word1     Word2     Gold
    --------  --------  -----
    tiger     cat       7.35
    book      paper     7.46
    computer  keyboard  7.62
    

    The scoring algorithm inside score.py computes the cosine similarity between all the senses for each pair of word in the word similarity datasets.

    for each w_1, w_2 in ws353:
       S_1 <- all sense embeddings associated with w_1
       S_2 <- all sense embeddings associated with w_2
       score <- -1.0
       For each pair s_1 in S_1 and s_2 in S_2 do:
           score = max(score, cos(s_1, s_2))
       return score
    

    where cos(s_1, s_2) is the cosine similarity between vector s_1 and s_2.

    Now we check our scores against the gold ones in the dataset. To do so, we calculate the Spearman correlation between gold similarity scores and cosine similarity scores.

    Word1     Word2     Gold   Cosine
    --------  --------  -----  ------
    tiger     cat       7.35   0.452
    book      paper     7.46   0.784
    computer  keyboard  7.62   0.643
    
    Spearman([7.35, 7.46, 7.62], [0.452, 0.784, 0.643]) = 0.5
    

    The score can be computed by running the following command

    python code/score.py sensembed.vec resources/ws353.tab

    Visit original content creator repository

  • s3cmd-backup

    Simple s3cmd backup script

    This is a simple script that compresses a specified folder and loads it into an aws s3 bucket using s3cmd.

    Getting Started

    Prerequisites

    • Unix-like operating system
    • s3cmd is a command line tool that makes it possible to put/get files into/from a s3 bucket. Please make sure that s3cmd is installed and configured.
      Check the s3cmd installation guide here and run s3cmd --configure after installation.
    • zip or tar should be installed
    • A configured aws s3 bucket

    Installation

    via curl

    $ curl -Lo backup https://git.io/fhMJy

    via wget

    $ wget -O backup https://git.io/fhMJy

    via httpie

    $ http -do backup https://git.io/fhMJy

    via git clone

    $ git clone https://github.com/MoonLiightz/s3cmd-backup.git
    $ cd s3cmd-backup

    Note

    Don’t forget to give the script execution permissions.

    $ chmod +x backup

    Configuration

    To configure the script, edit the downloaded file with an editor of your choice like nano or something else. At the top of the file you will find some configuration options.

    Config Option Description
    BACKUP_PATH Path to the location without ending / of the folder which should be saved.
    Example: If you want to save the folder myData located in /root than you should set BACKUP_PATH="/root"
    BACKUP_FOLDER Name of the folder which should be saved.
    Example: Based on the previous example you should set BACKUP_FOLDER="myData"
    BACKUP_NAME Name of the backup file. The date on which the backup was created is automatically appended to the name.
    Example: If you set BACKUP_NAME="myData-backup" the full name of the backup is myData-backup_year-month-day_hour-minute-second
    S3_BUCKET_NAME Name of the s3 bucket where the backups will be stored.
    Important: The name of the bucket and not the Bucket-ARN
    Example: S3_BUCKET_NAME="mybucket"
    S3_BUCKET_PATH Path in the s3 bucket without ending / where the backups will be stored.
    Example: S3_BUCKET_PATH="/backups"
    COMPRESSION The compression which will be used. Available are zip and tar
    Example: For zip set COMPRESSION="zip" and for tar set COMPRESSION="tar"
    TMP_PATH Path to a location where files can be temporarily stored. The path must exist.
    Example: TMP_PATH="/tmp"

    Usage

    Basic

    The script supports the following functionalities.

    Create Backup

    This command creates a backup and loads it into the specified s3 bucket.

    $ ./backup create

    List Backups

    With this command you can list the backups stored in the s3 bucket.

    $ ./backup list

    Download Backup

    To download a backup from the s3 bucket to the server you can use this command.

    $ ./backup download <filename>

    Cron

    You can also execute the script with a cronjob. The following example creates a backup every night at 2 a.m.

    0 2 * * * <path_to_script>/backup create

    License

    s3cmd-backup is released under the MIT license.

    Visit original content creator repository

  • tailwindscss

    Build Status License: MIT npm version

    Tailwind SCSS

    SCSS version of Tailwind CSS for people who don’t use modern module bundler.

    Why??

    The original Tailwind CSS use PostCSS for its CSS preprocessor. Therefore, we have to use Node.js module bundler (Webpack, Rollup etc) in order to get fully control over Tailwind’s customization. Unfortunately, there are many cases (mainly on legacy apps) where we couldn’t use Node.js and I don’t want this issue to prevent us from using Tailwind CSS.

    By using SCSS format, I hope that more people especially who have non Node.js apps can start using Tailwind CSS and progressively improve their tech stack to use the original version eventually.

    We try to keep this library as close as possible with future development of Tailwind CSS.

    Installation

    Using npm:

    npm install tailwindscss --save
    

    or yarn:

    yarn add tailwindscss
    

    Usage

    To use it on your SCSS, you can import entire style like this:

    @import "tailwindscss";

    or you can choose to import one by one:

    @import "tailwindscss/base";
    @import "tailwindscss/utilities";

    Configuration

    By default, it will generate all styles which are equivalent to Tailwind CSS’s default configuration. Below is what our configuration looks like.

    @import 'tailwindscss/src/helper';
    
    $prefix: ''; // Selector prefix;
    $separator: '_'; // Separator for pseudo-class and media query modifier
    
    $theme-colors: (
      transparent: transparent,
      black: #000,
    ); // Theme configuration
    
    $variants-text-color: (responsive, hover, focus); // Variants configuration
    
    $core-plugins-text-color: true; // Set false to disable utility

    To customize utilities, you need to import your own configuration file at the top of your SCSS file.

    @import "path-to/tailwind.config.scss";
    @import "tailwindscss/base";
    @import "tailwindscss/utilities";

    For starting out, you can run npx tailwindscss init to get full configuration.

    Note: You need to configure how your bundler can refer to tailwindscss node_modules yourself.

    Documentation

    Head over to the original website for more guideline about utilities. Of course, some sections like installation are not applicable for this library.

    Limitation

    Because of SCSS limitation, below features cannot be provided in this library:

    SCSS does not support several characters like colon (:) and backslash (/) because it will always be evaluated as language’s keywords. For your safety, keep your prefix and separator with dashes (-) and underscore (_) characters.

    TODO

    • important flag
    • responsive
    • pseudo-class (hover, focus, focus-within, active and group-hover)
    • colors
    Visit original content creator repository
  • AmazonPriceDropAlert

    Imagine never missing out on a price drop for your desired items on Amazon again. With PriceDropBot, you gain the upper hand in online shopping, effortlessly unlocking unbeatable deals and maximizing your savings.

    PriceDropBot is an innovative bot that works tirelessly behind the scenes to notify you via email whenever there’s a drop in the price of an item on Amazon. Bid farewell to the frustration of purchasing a product, only to discover it went on sale shortly after. PriceDropBot ensures you stay in the loop, empowering you to make informed buying decisions and seize incredible savings opportunities.

    But the potential of PriceDropBot extends far beyond tracking price drops. Here are some additional use cases that will revolutionize your shopping experience:

    Wish List Management: Create personalized wish lists on Amazon, and let PriceDropBot monitor prices for your desired items. Receive timely alerts when the prices plummet, enabling you to strike while the iron is hot.

    Deal Hunting: Are you a bargain hunter on the lookout for the best deals? PriceDropBot scours Amazon for you, highlighting irresistible discounts and limited-time offers across various product categories. Embrace the thrill of finding hidden gems and saving big on your purchases.

    Gift Shopping: Simplify the gift-giving process by using PriceDropBot. Add gift ideas to your watchlist, and let the bot notify you when their prices drop. Stay ahead of the game and surprise your loved ones with thoughtful gifts without breaking the bank.

    PriceDropBot is your ticket to smarter shopping, exceptional savings, and a world of unbeatable deals. Don’t miss out on the chance to supercharge your shopping experience. Discover the power of PriceDropBot and unlock a new realm of savings today!

    Made Purely in 🐍


    Packages Used

    • BeautifulSoup
    • Requests
    • UrlLib
    • CSV
    • Datetime
    • SmtpLib

    Prerequisites

    • bs4: pip install bs4
    • requests: pip install requests
    • An email with “Less Secure Apps” turned on, so that the app can send you an email.
      (I Suggest using a secondary email or maybe even creating a new one)

    How to Use?

    • Download/Clone this Repository
    • Run pricedropalert.py

    Visit original content creator repository

  • laravel-hmvc-generator

    Laravel 5 Package – HMVC Architecture Generator

    HVMC is a more-strongly design pattern based on MVC (Model-View-Controller). You got many advantages by using this pattern, especially if your project is very big.

    Key advantages (M.O.R.E):

    • Modularization: Reduction of dependencies between the disparate parts of the application.
    • Organization: Having a folder for each of the relevant triads makes for a lighter work load.
    • Reusability: By nature of the design it is easy to reuse nearly every piece of code.
    • Extendibility: Makes the application more extensible without sacrificing ease of maintenance.

    Find out more here: HVMC – Wikipedia

    Install & Update

    Install using Composer:

    composer require sethsandaru/laravel-hmvc-generator
    

    Update using Composer:

    composer update sethsandaru/laravel-hmvc-generator
    

    How to use?

    Notes

    • If you’re using Laravel 5.5+, then it’s ok, the framework itself will do the ServiceProvider scanning process.
    • If you’re using Laravel 5.4 and below, please add the HMVCServiceProvider into the providers in config/app.php
      • Full namespace path: SethPhat\HMVC\HMVCServiceProviderg

    First Initialize

    For the first time, please run this command:

    php artisan make:hmvc

    If you see the successful message, you’re done!

    Create a Module

    Use this command to create a new module:

    php artisan hmvc:create_module <Module_Name>

    A new module will be created inside the app/Modules folder.

    Config files

    To add your own configuration file and use the config function, please open config/hmvc.php

    You will see this:

    <?php
    //...
    return [
        'config_files' => [
            // your config file here
            // 'administration' => 'Modules/Administration/Configs/administration.php'
        ]
    ];

    Following the instruction above. You must add a right path to your config file, no full path, just the path in app folder.

    Example:

    <?php
    //...
    return [
        'config_files' => [
            'administration' => 'Modules/Administration/Configs/administration.php'
        ]
    ];

    I will get the config out like this:

    <?php
    //...
    config('administration.some_key_here');

    Supporting the project

    If you really like this project & want to contribute a little for the development. You can buy me a coffee. Thank you very much for your supporting ♥.

    Buy Me A Coffee

    Copyright © 2018 by Seth Phat aka Phat Tran Minh!

    Visit original content creator repository

  • restric-git-commit

    Commit validator

    This script validates the message structure of the commit command.

    • The line: msg=”$(cat $1 | grep -v # | head -n 1)” takes the
      message passed though the argument -m or by the interactive editor
      (vim, nano, etc) and procces the first not comment line (excludes the
      The lines with the # symbol.

    • In the line: if ! [[ $msg =~ ^(feat|fix|docs?|style|refactor|pref|chore|revert?)(.+):{1}\ ?.{3,}$ ]]; then Validates the message structure.

    Instructions

    Write the following code into a file named commit-msg and save it into: /repo/path/.git/hooks/

    #!/bin/sh
    
    RED='\033[0;31m'
    YELLOW='\e[33m'
    GREEN='\e[32m'
    CYAN='\e[36m'
    NC='\033[0m'
    BOLD='\e[1m'
    NORMAL='\e[0m'
    
    msg="$(cat $1 | grep -v \# | head -n 1)"
    if ! [[ $msg =~ ^(feat|fix|docs?|style|refactor|pref|chore|revert?)\(.+\):{1}\ ?.{3,}$ ]]; then
    	echo -e "${RED}${BOLD}Invalid commit${NORMAL}${NC}"
    	echo -e "\t${YELLOW}Follow the structure: \"type(module): description, at lease 3 words\""
    	echo -e "\tAvailable types:"
    	echo -e "\t\tfeat|fix|docs?|style|refactor|pref|chore|revert?${NC}"
    	echo -e "\t${CYAN}${BOLD}Example:${NORMAL} "
    	echo -e "\t\t${CYAN}revert(usersController): remove t3 validation${NC}"
    	exit 1
    fi
    

    Examples

    Navigate to your repo path

    Invalid commit message

    $ git commit -m "Invalid message"
    Invalid commit
    Follow the structure: "type(module): description, at lease 3 words"
    Available types:
    	feat|fix|docs?|style|refactor|pref|chore|revert?
    Example:
    	revert(usersController): remove t3 validation
    

    Valid commit message

    git commit -m "chore(BashCommitRule): write a valid message"
    [master ebdf4ef] chore(BashCommitRule): write a valid message
     1 file changed, 1 insertion(+)
    

    Visit original content creator repository