To keep a better overview of all mods, the issue tracker is located in a separate repository. For issues, ideas, suggestions or anything else, please follow this link:
Because of the way mod loader files are bundled into one jar, some extra information is needed to do a PR. A wiki page entry about it is available here:
Requires the library mod Collective. This mod is part of The Vanilla Experience modpack and Serilum’s Extra Bundle mod. Transcending Trident improves the vanilla trident’s functionality. You can use the Riptide enchantment without rain by holding a water bucket in your other hand. By default the mod also makes the trident more powerful, but you can toggle that inside the config file. Configurable:( how do I configure? ) mustHoldBucketOfWater (default = true): When enabled, Riptide can only be used without rain when the user is holding a bucket of water. tridentUseDuration (default = 5, min 0, max 20): The amount of time a player needs to charge the trident before being able to use Riptide. Minecraft’s default is 10. tridentUsePowerModifier (default = 3.0, min 0, max 100.0): The riptide power of the trident is multiplied by this number on use. Allows traveling a greater distance with a single charge. The effect in action (It’s amazingly fun!):
—————— You may freely use this mod in any modpack, as long as the download remains hosted within the CurseForge or Modrinth ecosystem. Serilum.com contains an overview and more information on all mods available. Comments are disabled as I’m unable to keep track of all the separate pages on each mod. For issues, ideas, suggestions or anything else there is the Github repo. Thanks!
This repository is designed to help you to create a database system between two kubernetes clusters and merge the data between two clusters in real time.
Diagram
Before you begin
You need 2 kubernetes clusters avaiable on any cloud platforms
Those two clusters shoud be on the same VPC! or do the VPC peering in case the clusters are on different VPCs.
Confirm that TiDB operator is running on both clusters
kubectl get pods --namespace tidb-admin -l app.kubernetes.io/instance=tidb-operator
output
NAME                                       READY   STATUS    RESTARTS   AGE
tidb-controller-manager-6d8d5c6d64-b8lv4   1/1     Running   0          2m22s
tidb-scheduler-644d59b46f-4f6sb            2/2     Running   0          2m22s
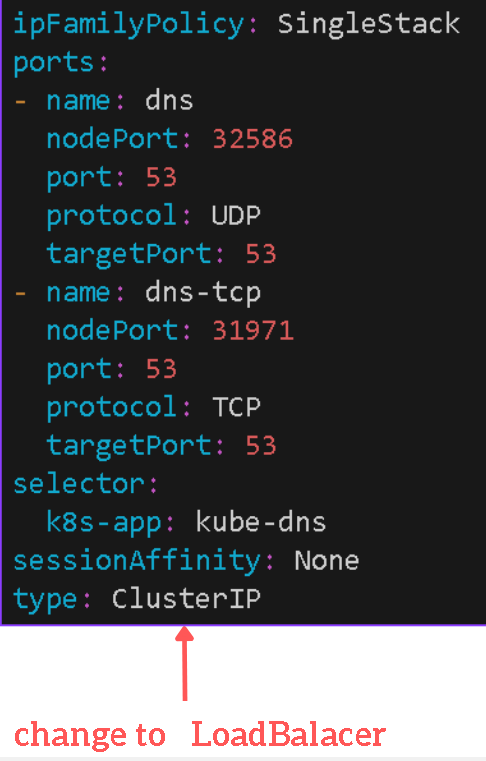
Get DNS service in our cluster
kubectl get svc -n kube-system --context=${context1}
output
NAME                          TYPE           CLUSTER-IP    EXTERNAL-IP     PORT
kube-dns                      ClusterIP   10.0.0.10     <none>   53:32586/UDP,53:31971/TCP
metrics-server                ClusterIP      10.0.45.125   <none>          443/TCP
npm-metrics-cluster-service   ClusterIP      10.0.62.42    <none>          9000/TCP
External Ip of kube-dns is not avaiable in case of type of kube-dns service is ClusterIP, if we change the type of kube-dns service to be LoadBalancer, the external-ip will be avaiable
kubectl get svc -n kube-system --context=${context1}
# Do this with the other cluster and copy both of the External IP
# In this example for ${cluster1} ip is 20.247.240.14
# In this example for ${cluster2} ip is 20.205.255.74
Forward DNS IP to make both clusters can communicate each other
Edit coredns/corednscluster1.yaml with your External Ip from cluster2
Edit coredns/corednscluster2.yaml with your External Ip from cluster1
Example coredns/corednscluster1.yaml
    apiVersion: v1
    kind: ConfigMap
    metadata:
    name: coredns-custom
    namespace: kube-system
    data:
    puglife.server: |
        hello-2.svc.cluster.local:53 {
        errors
        cache 30
        forward . 20.205.255.74 {
            force_tcp
        }
    }

    # puglife.server : any name with .server is fine
    # hello-2 : your namespace that tidbcluster will be allocated in $cluster2
    # 20.205.255.74 : External DNS IP from cluster 2
NAME                 TYPE     DATA   AGE
backup-tidb-secret   Opaque   1      9h
s3-secret            Opaque   2      9h
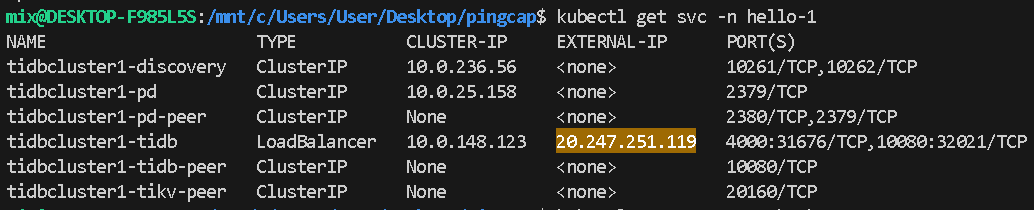
Copy the External IP of TiDB cluster context1 (db cluster1)
kubectl get svc -n hello-1 --context=${context1}
Copy minio IP
kubectl get pod -n minio-dev -o wide --context=${context1}
Create an admin user on db cluster1
kubectl --context=${context1} port-forward -n hello-1 svc/tidbcluster1-tidb 15000:4000

# Execute this command
# Password should be the same as secret
# kubectl create secret generic backup-tidb-secret --from-literal=password=mypassword -n backup-test

CREATE USER 'admin1' IDENTIFIED BY 'mypassword';
GRANT ALL ON test.* TO 'admin1';
GRANT ALL ON mysql.* TO 'admin1';
SHOW GRANTS FOR 'admin1';
Edit backup/full-backup-s3.yaml
apiVersion: pingcap.com/v1alpha1
kind: Backup
metadata:
name: demo1-full-backup-s3
namespace: backup-test
spec:
backupType: full
br:
    cluster: tidbcluster1 <- same name in tidbcluster/tidbcluster1.yaml
    clusterNamespace: hello-1 <- namespace that the tidbcluster is allocated
from:
    host: "20.247.251.119" <- External IP of tidbcluster
    port: 4000
    user: admin1 <- User that you created in db
    secretName: backup-tidb-secret
s3:
    provider: aws <- Can be anything you prefer
    secretName: s3-secret
    endpoint: http://10.1.1.44:9000 <- minio IP
    bucket: my-bucket <- Bucket that created in the minio dashboard
    prefix: my-full-backup-folder
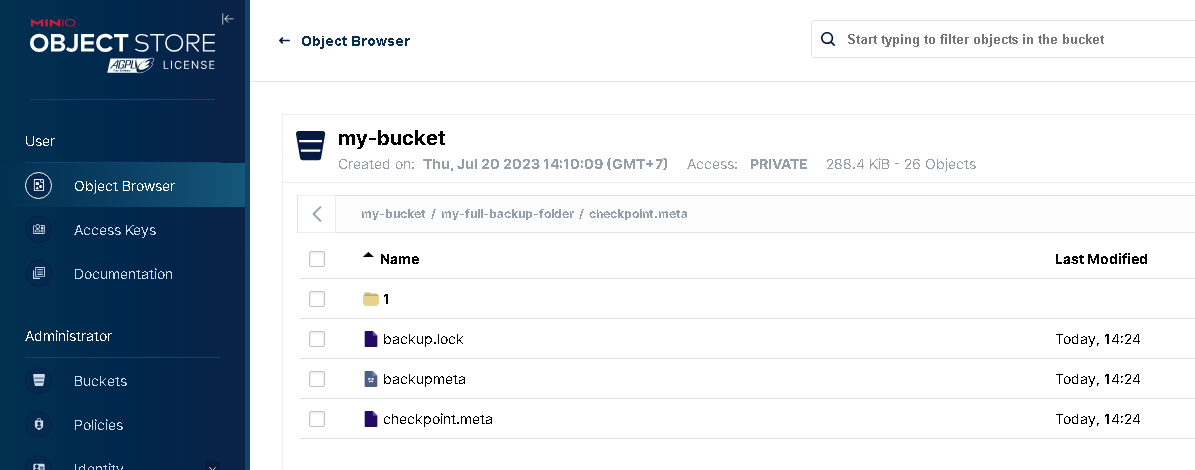
Apply full backup to Minio
kubectl apply -f backup/full-backup-s3.yaml
# if data is exist, then you successful backup data with minio
Most open source projects are simply forgotten and die a slow and lonely death.
usocial was different. Same same, but different.
It started as a personal RSS feed reader, evolved into a Podcasting 2.0 client, got released on Umbrel OS…
You could run usocial on your own Umbrel personal server, follow your favourite blogs, subscribe to your favourite podcasts…
usocial would connect to your own Lightning node and, while listening to a podcast episode, you could send sats directly to the podcaster. The payment would even automatically be split, according to the podcaster’s desire, and go to different recipients.
It had a terrible UI, but it worked beautifully. It was my way of keeping up to date with podcasts and blogs and tipping creators.
Then, something happened.
usocial didn’t die, it just evolved into something else: Servus (2022-).
I realized that more important than following blogs and podcasts is publishing your own content. Only after there is a solid way for anyone to self-host their web site and publish content will there be a need for a self-hosted way to subscribe to content.
I used to be a fan of Jekyll, but I realized that it is not for the mere mortals to use. I hated WP, which I had used since 2005 or so. WP was more user-friendly than Jekyll and other SSGes, but it just did not click with me.
I had written a few CMSes before (2008-2012), mostly trying to host my photoblog in a pre-Flickr era and to build a sort-of online travel log. See nuages, tzadik, feather and travelist.
Then it all clicked. The missing piece was a CMS. I could take a lot of ideas from Jekyll, while trying to keep the usability of WP.
That is how Servus was born and that was the end of usocial.
It didn’t die, it just evolved.
Setting up the development environment
Clone the repo
git clone https://github.com/ibz/usocial.git && cd usocial
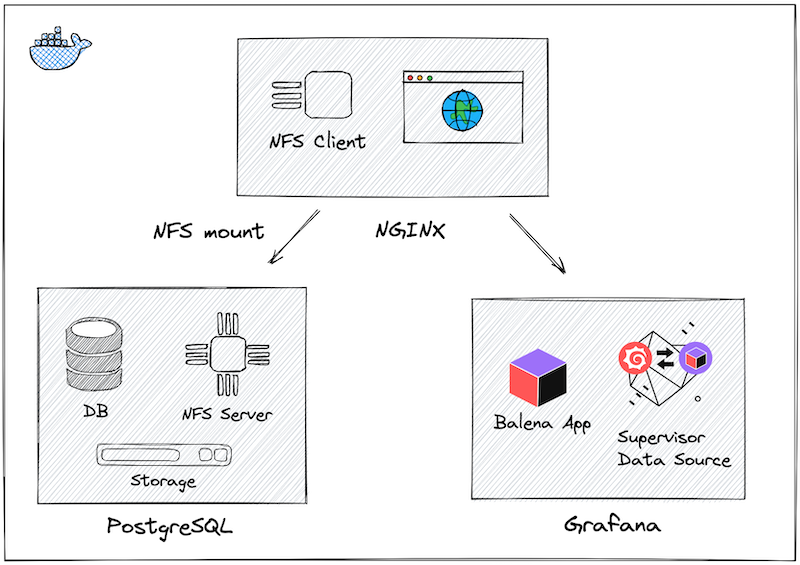
balenaOS 2.105.19 is required for Nvidia Jetson AGX Orin Devkit with NFS version 4.
balenaOS 2.99.27+rev1 is required for NFS version 4.
balenaOS 2.98 is required for NFS version 3.
balenaCloud
The Balena NFS project can be deployed directly to balenaCloud:
Features
Includes a NFS Server build on top of the PostgreSQL Alpine image using OpenRC to manage NFS services.
Supports various environment variables to specify storage label, mount point, etc.
Includes a NFS Client build on top of the NGINX Alpine image using custom Entrypoint script to mount NFS export.
Provides Grafana Dashboard to manage running services and display configuration using Supervisor API. Default Grafana username and password is admin/admin.
Supports NFS version 4 and version 3.
Allows to set NFS in sync or async modes.
Tested
Nvidia Jetson AGX Orin Devkit (jetson-agx-orin-devkit)
Raspberry Pi4-64 (raspberrypi4-64)
Jetson Xavier (jetson-xavier)
x86-64 (genericx86-64-ext)
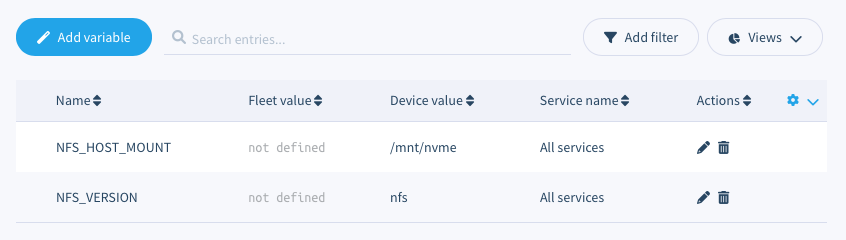
Environment Variables
Environment Variable
Value
Description
STORAGE_LABEL
storage
External Storage ID, if not found tmpfs will be used instead.
STORAGE_MOUNT_POINT
/mnt/nvme
Local mount point to mount Storage or tmpfs.
POSTGRES_PASSWORD
postgres
Password for the PostgreSQL database.
PGDATA
/mnt/nvme/postgresql/data
PostgreSQL path on the Storage or tmpfs mount point.
NFS_HOST
localhost
NFS host, should be localhost for the local container.
NFS_HOST_MOUNT
/
NFS exported mount. Set full path /mnt/nvme for NFS version 3.
NFS_MOUNT_POINT
/mnt/nvme
Mount point to mount NFS export.
NFS_SYNC_MODE
async
Async or Sync mode.
NFS_VERSION
nfs
Set nfs4 to force use NFS version 4.
NFS version 3
To support NFS version 3 please update Environment Variables:
Balena Application
The Balena Application for Grafana allows to display device information and manage services using Balena Supervisor API.
Working in a productive alliance, Balena, Grafana, and the Balena Application plugin simplify managing a network of non-homogenous IoT devices.
Feedback
We love to hear from users, developers, and the whole community interested in this project. These are various ways to get in touch with us:
Ask a question, request a new feature, and file a bug with GitHub issues.
Sponsor our open-source plugins for Grafana with GitHub Sponsor.
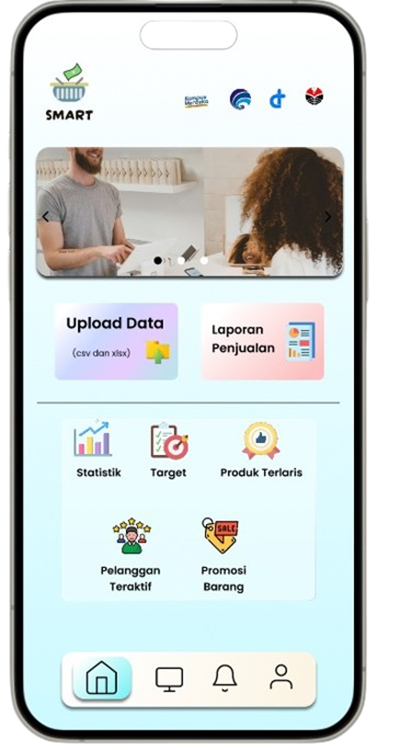
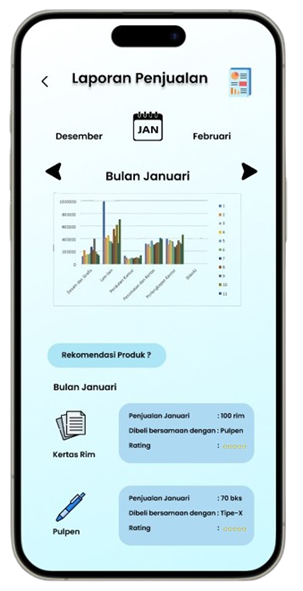
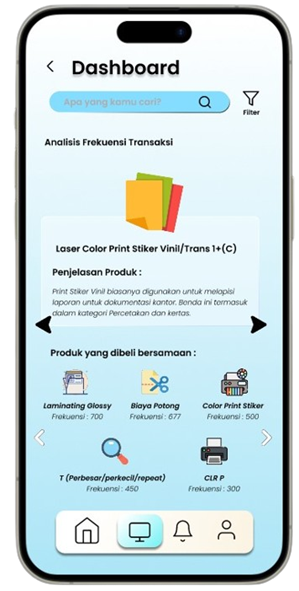
Transformasi Pemasaran Alat Tulis Melalui Analisis Asosiasi Data
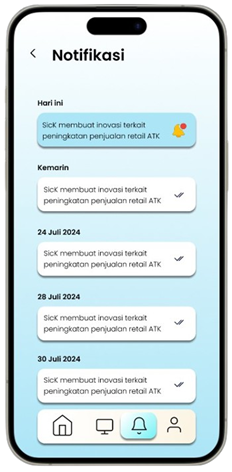
Solution: SMART (Sistem Rekomendasi Produk Alat Tulis Dan Peralatan Kantor)
Ringkasan
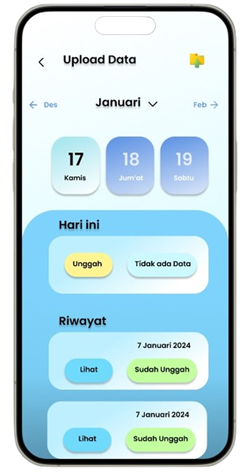
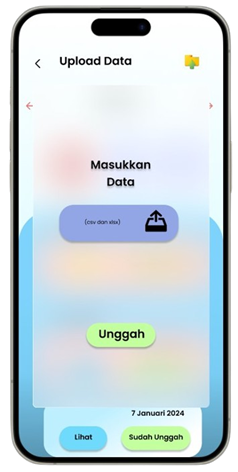
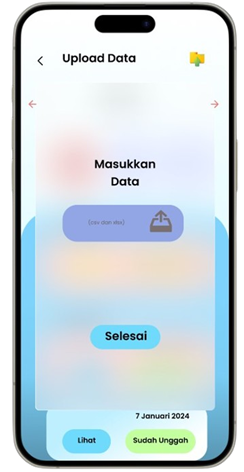
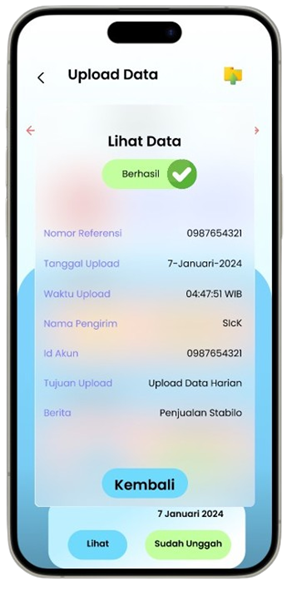
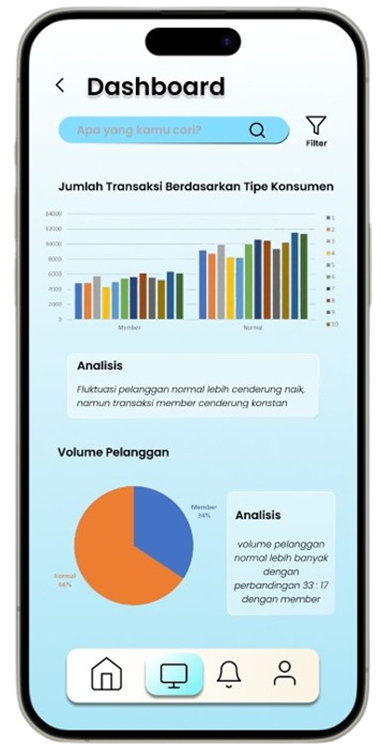
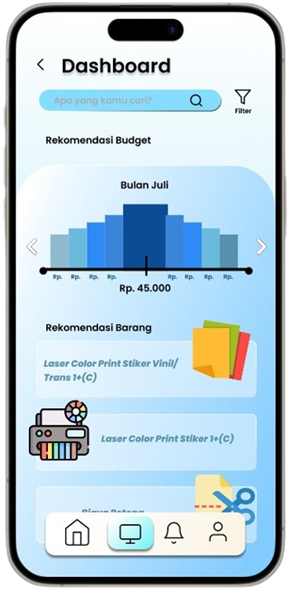
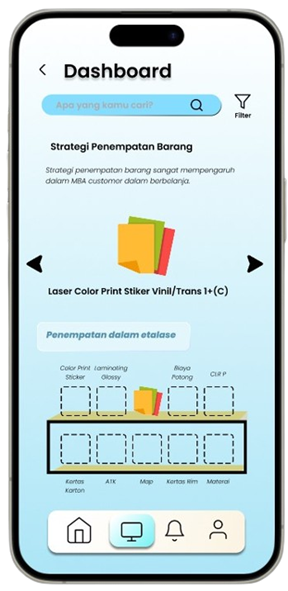
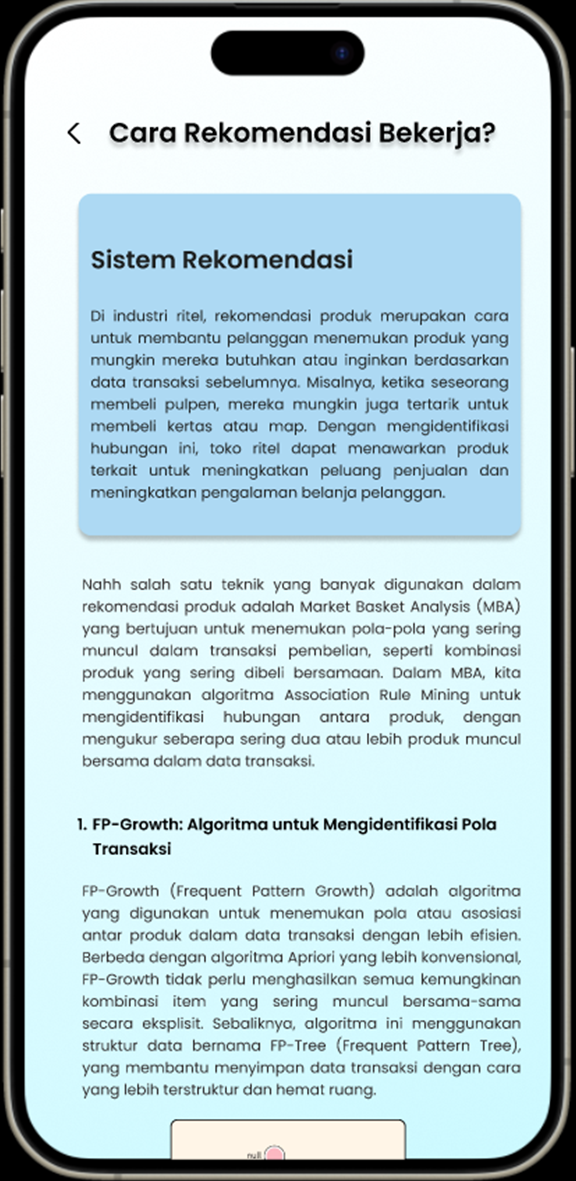
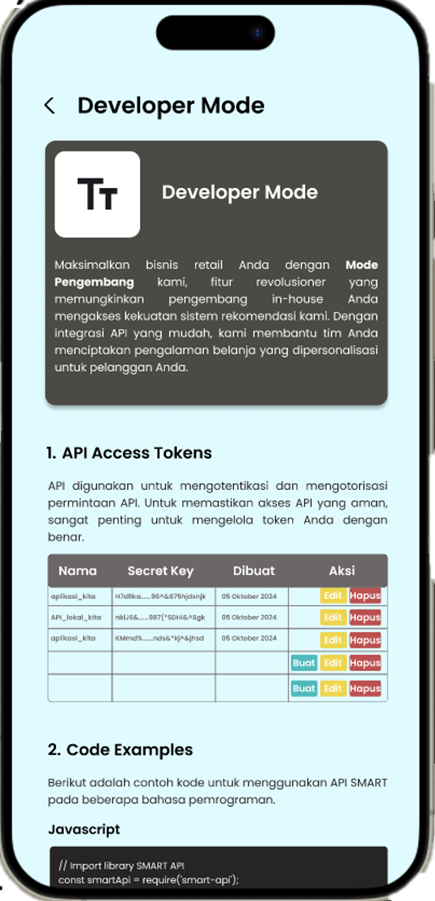
Permintaan untuk produk alat tulis dan perlengkapan kantor di Indonesia meningkat seiring dengan pertumbuhan sektor pendidikan dan bisnis, namun banyak toko retail kesulitan mengoptimalkan promosi produk berdasarkan data transaksi (Ismarmiaty, 2023). SMART (Sistem Rekomendasi Produk Alat Tulis Dan Peralatan Kantor) dirancang untuk membantu toko alat tulis dan perlengkapan kantor meningkatkan efektivitas promosi produk dengan memberikan rekomendasi berbasis data transaksi terkini. Dengan memanfaatkan teknik Market Basket Analysis (MBA) dan algoritma FP-Growth, aplikasi ini melakukan analisis mendalam terhadap pola pembelian dan mengidentifikasi asosiasi produk yang sering dibeli secara bersamaan (Sagin, 2018). Hasil analisis digunakan untuk mengidentifikasi beberapa jenis rekomendasi produk teratas yang paling relevan untuk dipromosikan setiap periode. SMART tidak hanya menyederhanakan pengambilan keputusan bagi pegawai toko, tetapi juga memungkinkan integrasi dengan sistem operasional yang ada melalui API, sehingga data dan hasil rekomendasi dapat disinkronkan secara otomatis. Salah satu rekomendasi kunci adalah produk yang dijual dengan kategori Percetakan dan Kertas yang jaraknya dekat dengan produk kategori Perlengkapan Kantor sehingga meningkatkan efektivitas strategi pemasaran. Aplikasi ini memberikan dampak signifikan dengan mengurangi ketergantungan pada promosi manual dan meningkatkan penjualan melalui pendekatan yang lebih cerdas dan tepat sasaran. Pengembangan selanjutnya dapat difokuskan pada peningkatan algoritma agar semakin adaptif terhadap tren pasar lokal.
This project is using pnpm as a way to manage dependencies and workspaces.
With the project cloned, install the dependencies from the root of the project with:
pnpm install
Configuration
To work on the project, you need to have an active Cloudinary account.
With the account, configure a .env file inside of docs with:
PUBLIC_CLOUDINARY_CLOUD_NAME="<Your Cloudinary Cloud Name>"
PUBLIC_CLOUDINARY_API_KEY="<Your Cloudinary API Key>"
CLOUDINARY_API_SECRET="<Your Cloudinary API Secret>"

PUBLIC_ASSETS_DIRECTORY="assets"
Note: The Cloudinary account can be free, but some features may not work beyond free tier like Background Removal without enabling the add-on
The Cloud Name is required for all usage, where the API Key and Secret currently is only used for Upload Widget usage. The Upload Preset is additionally used for the Upload Widgets.
Uploading Example Images
In order to run the Docs project, you need to have the images and videos referenced available inside of your Cloudinary account.
Most of the images and videos used in the project take advantage of the sample assets included in every Cloudinary account, so some may work out-of-the-box, but not all.
To upload the remaining assets, navigate to the scripts directory and first create a new .env file with:
CLOUDINARY_CLOUD_NAME="<Your Cloudinary Cloud Name>"
CLOUDINARY_API_KEY="<Your API Key>"
CLOUDINARY_API_SECRET="<Your API Secret>"
By default, the images and videos inside of scripts/assets.json will be uploaded to the “assets” directory inside of your Cloudinary account. To change the location, add the CLOUDINARY_ASSETS_DIRECTORY environment variable with your preferred directory:
CLOUDINARY_ASSETS_DIRECTORY="<Your Directory>"
Note: You will then need to update the /docs/.env file to reference the same directory.
To run the script, install the dependencies:
pnpm install
Then run the upload script with:
pnpm upload
Uploading Example Collections
Collections are groups of images that are showcased using the cldAssetsLoader helper.
The directories that make up the sample images include too many images to reasonably
ask a contributor to upload.
We have a few options then.
Skip uploading the collections
If you’re not working on cldAssetsLoader, or you can test using the single example
that utilizes the samples directory, you may not need to worry about this.
Change the collections location
You could update these directories in the docs/src/content/config.ts file to directories that
already exist in your account, such as other sample directories.
Upload Manually
If you want to have assets available to test this out, you can create the following directories
and include some assets inside.
collection
ecommerce/fashion
ecommerce/sneakers
A good way to handle this is to download some images from Unsplash or your favorite stock photo site.
Running the Project
Once installed and configured, from the root of your project run:
pnpm dev
The project will now be available at http://localhost:4321 or the configured local port.
“There is no terror in the bang, only in the anticipation of it.”
— Alfred Hitchcock
Hitchcock
Hitchcock is a debugging tool for React Suspense. It wraps your calls to React.lazy(), provides a simple cache (based on react-cache) and let you pause, delay or invalidate your promises.
🚨 EXPERIMENTAL 🚨
Use this only for experimenting with the new React Concurrent Mode. Hitchcock is inefficient and unstable. Also, I have no idea what I’m doing.
Instead of using React.lazy import lazy from hitchcock:
import{lazy}from"hitchcock";constHomePage=lazy(()=>import("./components/HomePage"));// Hitchcock's lazy accepts a second parameter with the name of the component:constArtistPage=lazy(()=>import("./components/ArtistPage"),"ArtistPage");// it's optional, but recommended, it isn't always easy to guess the name from the import
createResource has two parameters. The first one is a function that returns a promise. The second one is a function that returns an id, that id is used as the key in the cache and also is used as the name of the resource in the debugger.
It returns a resource with a read method that will suspend a component until the resource is ready (when the promise resolves).
Web-service with RESTful API that allows to generate a random saying, like or dislike it and add own saying (adding a saying is currently unavailable).
Application uses Play framework and Cassandra as a database.
# drops existing keyspace with all data
./gradlew dropSchema

# creates keyspace and necessary tables (just executes commands from "conf/create.cql" file)
./gradlew createSchema

# fills existing tablies with data from "conf/init_data.txt" file
./gradlew fillTables
API
GET /sayings HTTP/1.1
controllers.Main endpoint, from it you can generate random saying or add own.